
These are some really good XP tips of all time I found while surfing. I’m sure you will find these useful. Have a look.
Tip 10: Halt background services to improve performance.
This tip is one of our favorites because it always works. Running in the background of Windows are scores of services, small processes used by Windows and many Windows applications. The thing is, you don’t need all these services — especially for applications you never use — and many of them actually slow your PC down.
Win XP power users have long known that you can easily eke a little extra performance out of your PC by disabling services that are completely unnecessary or that don’t need to be running all the time. Here’s how it works.
1. Click Start > Run, type services.msc and click OK. This will bring up the Services management console. Click on the Extended tab at the bottom of this window; each background service running on your PC is listed here. Windows includes a fairly detailed description of each service; simply drag the Description column wider to read more of each description, or click on a service to see its full description in the left pane.
2. Double-click a service to bring up a window with several options. In the Startup Type area, you can set the service to run automatically in the background at all times so it’s ready whenever it’s needed, or you can tell it to run manually, which means you’ll have to go into this Services management console and re-enable it if an application needs it.
You can also completely disable the service. In general, you want to disable services tied to applications and/or features you don’t use or rarely use. You can find a great list of appropriate services to disable at the Elder Geek’s Services Guide For Windows XP.
If you’re logged onto the computer as the administrator, you can also pause the service (click the Pause button in the Service Status area just below the Startup Type area), then see how the computer behaves. Danger signs include crashes or other erratic behaviors in your applications, such as running slowly or getting stuck on a query prompt. Click Resume to start up the service again.
Tip 9: Increase available disk space by scaling back System Restore.
It’s not perfect, but Windows System Restore is a useful first step in recovering your PC or drive from a major system error. However, it can consume more than 10 percent of your total hard drive space.
If you find yourself desperate for an extra few gigabytes — particularly on secondary storage drives — there’s an easy way to reclaim data space by simply limiting the number of System Restore points Windows XP establishes. This one’s a snap and there’s no tangible increase of risk, which is why we love it.
1. Right-click on My Computer and select Properties > System Restore.
2. If you have just one hard drive, skip to step 3. Otherwise, select the drive on which you want to gain storage space and click the Settings button.
3. Adjust the slider to the left to use less disk space, and Win XP will reduce the number of System Restore points by the appropriate amount.
Tip 8: Scrub your hard drive clean.
Windows Support Tools, provided free by Microsoft, are a suite of some 20+ separate applications that are extremely handy for a number of uses. Ordinary PC users probably won’t use many of these apps — they’re mostly used by IT pros to troubleshoot and analyze Windows XP. But even if you’re not an expert, don’t be afraid of using the Windows Installer Clean Up Utility, which will help you remove all leftover files from a failed uninstall of a Windows Installer application.
Download Windows Support Tools from Microsoft’s Download Center. (If you’re curious about the other apps in the suite, check out the help file included in the Windows Support Tools Program group.)
To run the Windows Installer Clean Up Utility, go to the command prompt (select Start > Run) and type msicuu.exe. You’ll see a list of all applications with uninstall data. Select the ones you want to get rid of and click the Remove button. Obviously, you want to use caution here — don’t clear the install data for an application unless you’re absolutely sure you won’t ever need it.
Tip 7: Run two displays on the same PC.
This tip is for the worker bee. Adding a second display to your PC won’t quite double your productivity, but it will make your computing life easier. Walk around a cube farm these days, and you’ll likely see at least a few power users doubling up.
Thankfully, Windows XP makes it extremely easy.
1. Plug the second display into your computer. (Many video cards today have a second Video Out port; if not, you’ll have to install a second video card.)
2. Right-click on your desktop and click Properties to bring up the Display Properties window. Click on the Settings tab.
3. See the grayed-out box to the right of the black box? That’s your second monitor. Click on it and then click the check box next to “Extend my Windows desktop onto this monitor” to enable it. From here you can adjust the resolution of the secondary display. The goal here is to have a desktop that spans both of your displays, so if your second screen is physically located to the left of your primary one, drag and drop the #2 monitor to the left of the #1 display.
Tip 6: Force unresponsive applications to close at shutdown.
When it comes to balky PCs, few things annoy us more than the moment when we try to shut down Windows and it tells us it can’t because some crashed application isn’t responding, and that we have to do it ourselves by clicking the End Now button.
This registry hack changes that. Here’s how it works.
1. Launch RegEdit (select Start > Run, type regedit and click OK) and browse to HKEY_USERS\.DEFAULT\Control Panel\Desktop
2. Find the string called AutoEndTasks. Right-click it, select Modify from the pop-up menu, and change the data value from 0 to 1. (If you can’t find this string, create it by selecting Edit > New > String Value and set the data value to 1.)
3. Close RegEdit and reboot.
Tip 5: Automatically optimize your hard drive.
One of the keys to system performance is an optimized hard drive. Typically, you optimize your hard drive using Windows’ Defrag utility. But there’s a great registry hack that will force Win XP to automatically optimize the location of files when your PC is idle. Here’s how it works.
1. Open RegEdit and browse to HKEY_LOCAL_MACHINE\SOFTWARE\Microsoft\Windows\CurrentVersion\ OptimalLayout
2. Find the string called EnableAutoLayout, and change its data value to 1. (If this string doesn’t exist, create it and set the value to 1.)
3. Exit RegEdit and reboot your PC. Done!
Tip 4: Set a custom resolution.
Notice a trend in the second half of this story? If you answered, “They’re all registry hacks,” you are correct. Windows XP’s registry loads an amazing amount of flexibility and customization in a fairly low-risk package.
Tip number 4 on our list is another one of our favorite registry hacks. Windows XP allows you to specify a large number of set screen resolutions based on what types of images your display can accept. However, in a few rare instances, you may want to specify a non-standard resolution for a clearer or more accurate picture. This tip allows you to do just that. It’s one of those tips that doesn’t seem all that handy — until you desperately need it. Plus, it’s just plain cool. If you have a wonky projector or TV screen you want to use with a laptop or PC, you might want to give this a try.
Here’s how it works:
1. Open RegEdit and browse to HKEY_CURRENT_CONFIG\System\CurrentControlSet\Control\VIDEO\ {the address of your primary video card…it often begins with “23A77BF7″}\0000\
2. The Default Settings.XResolution data value is the horizontal resolution, and the Default Settings.YResolution data value is the vertical. Double-click the Default Settings.XResolution data entry, select the Decimal radio button, and in the Value Data field, enter your desired horizontal resolution. Then do the same with Default Settings.YResolution to change the vertical resolution.
3. Exit RegEdit and reboot your PC.
If you’re scared of tweaking your registry on this one, a handy app called PowerStrip ($29.95, available for a free try-before-you-buy download), allows you similar resolution-changing functionality.
Tip 3: Stay on top of registry changes.
Given the power and flexibility of Windows XP’s registry (and the large number of registry hacks in this Top 10), it’s no surprise that the number 3 XP tip involves keeping track of any and all changes made to your registry.
But given the prevalence of spyware, rootkits, and other malware these days, knowing what you’ve done to your registry is a secondary concern to knowing what other applications are doing to it.
For peace of mind — and occasionally, for curiosity’s sake — we consider SysInternal’s Regmon an essential piece of our OS. It’s a freeware application that allows you to browse through all the keys in the registry, filtering in a variety of ways to pinpoint specific registry changes.
For example, you can quickly filter for certain applications. If you’re having trouble with Windows Media Player, you click on the Options menu, then Filter. At the menu, type wmplayer into the Include field. When you see the resulting list, you can double-click any entry to open up its registry value.
Because you can search and filter, Regmon is also an excellent method for tracking down hard-to-find registry items.
Tip 2: Recover lost data.
Everyone has accidentally deleted files from their hard drive, and very few feelings are as low as the moment right after you nuke 300 irreplaceable photographs of your kids/dogs/life. Actually, one feeling is worse than that: accidentally quick-formatting your entire drive.
Even if you regularly back up your drives, mistakes happen. That’s why this tip is paramount. It’s also really simple. There’s an excellent downloadable data recovery app for XP called Zero Assumption Recovery that can help. Don’t waste another minute — download and install it now.
When you run into trouble, here’s what to do:
1. The moment you delete your data, stop using your hard drive. Don’t save or install any new applications — they’ll be written over your recently departed data.
2. Run Zero Assumption Recovery. You already had it installed, right?
3. Select the hard drive you want to scan. Wait for the scan to finish. (This can take between one and two hours — part of Zero Assumption Recovery’s effectiveness is its thoroughness.)
4. With any luck, you’ll see a list of your missing folders and files. The freeware version of Zero Assumption Recovery allows you to recover up to four folders per scan. If you pay $100 for the full version, you get full recovery.
Note: You can also use Zero Assumption Recovery to recover deleted photos from your camera’s memory card.
Tip 1: Automatically log when and why shutdowns have occurred.
Love it or hate it, Windows XP is undeniably more stable than its predecessors. But it still crashes, and it still has occasional trouble shutting down. This registry hack logs all shutdown errors, telling you when, where, and why strange and annoying things have happened.
Some folks have the luxury of packing their buggy PC off to a help desk. But if you like to get your hands dirty, consider this essential tweakage.
Here’s how to set up logging for unexpected system shutdowns:
1. Open RegEdit and browse to HKEY_LOCAL_MACHINE\SOFTWARE\Microsoft\Windows\CurrentVersion\ Reliability
2. Set the ShutDownReasonUI data value to 1. (If this string doesn’t exist, create it and set the value to 1.)
3. Exit RegEdit and reboot your PC.
To examine the log you’ve created, open up the Event Viewer, which you’ll find by selecting Control Panel > Administrative Tools > Event Viewer. Click on the System subheading and you’ll see a massive list of system events. Errors will be marked with a red X or a yellow exclamation mark. Double-click on the error and you’ll see details that may help you unravel the mystery.


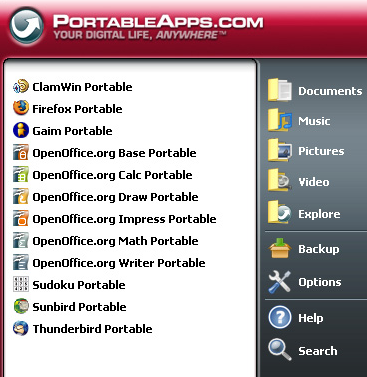
 The great people over at PortableApps.com have done it again. This time they have made the next major version of Firefox browser, version 3, available as a portable app. This means you can run Firefox 3 without disrupting the current Firefox installation and check out all the new features.


 lose everything. For everyday applications such as browsers, backing up your bookmarks does not require a complete hard drive backup to keep them from being completely wiped out.
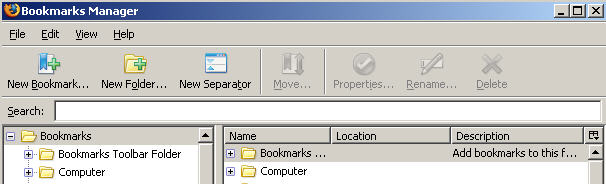
 How many times have you been force to wait for a simple task to complete because something in the background ends up thrashing your hard drive, slowing everything down? Helpless, you watch the light on the hard drive go from a flicker to a continuous glow, leaving you to wonder what process or program is the culprit.
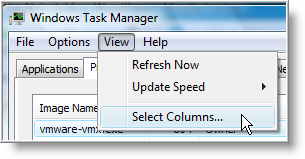


 “X and Y are now friends on Facebook” - That’s the message displayed in your Facebook profile each time you add a new friend on Facebook or someone else confirms your pending request.
 Try removing lines that are related to various add-ons, and you will at some stage remove the line/lines that are causing the problem.
  Apple introduced
 “This web page has sponsored content which requires connecting to Google AdSense servers. Will you allow your browser to make this connection?”


